Table of Contents
How To Design Garden Steps DIY Style
There are a variety of materials to choose from when designing garden stairs. The material you choose should be based on your area, the purpose of the stairs and your budget. Some of the most popular materials used by homeowners include:
- Bricks
- Cinder Blocks
- Concrete
- Crushed Rocks
- Natural Stone
- Precast Concrete
- Prefabricated Stone
- Wood
The Benefits of Garden Steps in a Landscape
Why do gardens need steps? For one thing, they have a visually appealing way of connecting everything in the landscape together. These hardscapes also make it easier to get up and down grains or slopes when designed properly,
Garden steps must be safe, even at night. They should also be comfortable to use. Here are some of the benefits of landscape steps in your landscape:
- Transition – Safely get from one level to the next
- Erosion – Helps prevent erosion and provides better drainage after rain
- Visual Appeal – Acts as a focal point for the garden, depending on the design
Adding Stairs to Garden Slopes and Grades
Hillside landscaping can be a little tricky. The same goes with hard-to-access steep slopes and grades. It’s best to build risers for these areas that are 6.5 to 8 inches in height.
Keep in mind that you want users to feel comfortable and safe when using the steps to maneuver through the landscape slopes. Therefore, make sure that are wider than 30 inches.
How to Build Outdoor Rust-Proof Wood Steps
Interested in using pressure-treated wood to build stairs for your garden? By adding some galvanized hardware to the mix, you can help prevent weather and water damage as well as rust and rot. Here are the steps to build steps using these materials that lead from your back door out into the garden area itself:
1. Design Your Garden Steps
Using a tape measure, determine the distance between the ground and your back door. Then, create a sketch design for the outdoor stairs. Every step should be the same depth and height, which should also meet your local building codes.
The measurements above are used to decide how long your stringers should be (vertical support boards), as well as the distance between the stringers base and the house itself. These are measurements commonly used for this DIY outdoor stair building project:
- Height – 6-inch by 7-inch rise
- Depth – 10-inch by 16-inch run
2. Dig Holes for Footings
Decide where you want your stringers to lay. This is where your concrete footings will be installed to support the stringer bottoms. Dig holes in these areas to install the footing, making sure the depth of the holes meets local building requirements.
3. Cut Form Tubes
Cut heavy-duty cardboard form tubes to height and slide them inside the holes, ensuring that the form tops are level. Using a wheelbarrow and hoe, mix up your concrete based on the directions on the packaging. It should have an oatmeal-like consistency. Pour it into the forms and use a towel to smooth out the concrete.
4. Cut 2” X 4” Supports
Cut 2-inch by 4-inch pressure-treated wood so it fits snugly between the concrete footers. Grab another 2-inch by 4-inch piece of wood and fit it behind the footers. Both will act as your stringer support.
5. Fit Bottom Posts in Place
Cut posts for the top and bottom from 4-inch by 4-inch wood. Measure the bottom posts making sure they are the height of the post plus the depth of the footing. Push the posts into the wet concrete, keeping them in position until the concrete is dry.
6. Cut the Stringers
Measure the cut lines using a carpenter’s square. Mark them based on the run and rise. Cut along those lines using a circular saw making sure to stop right before the end of the lines. For cleaner, more controllable cuts, finish them using a jigsaw.
7. Position Stringers
After the concrete has completely dried, put the side stringers in place. Attach them to the bottom posts using lag bolts that are galvanized. Attach them to the 2X4s on the ground and ledger using deck screws.
8. Cut Rails
Cut pressure-treated 2-inch by 4-inch wood for your bottom and top rails. Use galvanized deck screws to attach the posts to them. Do the same for the handrails and use a router to smooth out the edges.
9. Attach Risers and Runners
Using pressure-treated 2-inch by 6-inch wood, measure and cut your vertical risers and horizontal runners. Smooth the runner edges using a router. Attach the risers using decks screws. Then, do the same to attach the runners.
10. Install Rails
Measure vertical rails and cut them from 1-inch by 2-inch wood. Use galvanized deck screws to install them. The distance between the vertical rails should be based on your local building codes. In most cases, safety codes require at least six inches.
How to Build Outdoor Wood & Pea Gravel Steps
Adding pea gravel to your DIY outdoor steps adds a little more support for the stairs themselves. Here are the steps to getting this done:
1. Clear Area
Remove the current stairs and all large rocks using a sledgehammer and shovel. For safety reasons, wear protective eyewear during the process.
2. Flatten Area
Use a shovel to flatten the area where you plan to install each step. Compress it down and level it out using a hand tamper. Note that each step needs to be about 4-6 inches in height or no less than your post width.
3. Cut Posts
Measure your posts and cut each one into three pieces:
- One = 30 inches
- Two = 19 inches
4. Create Frames
Determine where the spikes will go and pre-drill the holes using a 3/8-inch bit. Attach the three posts together by hammering the spikes in to create the frame for your stairs. Repeat this process until all of your steps are built.
5. Put Bottom Step in Place
Place your bottom step in the desired location. Use stones or dirt to make sure it’s leveled. A leveler will help you determine this.
6. Secure Steps
To help the steps remain in place over time, pre-drill ½-inch pilot holes. Then add 24-inch rebar by hammering it in on either side.
7. Secure Next Step
Place the frame of the next step on top of the bottom step. Use a leveler to ensure that it’s level. Hammer galvanized spikes into the frame’s top and into the step below it. Continue repeating the process until each one of your planned steps is installed and secured to the step below.
8. Smother Weeds
Cur weed block to fit within each frame using a utility knife or scissors and lay the material inside. Or, you can add layers of cardboard to smother the weeds and unwanted grass organically.
9. Add Gravel
Place pea gravel on top of the cardboard or weed block. Then, use your hands to level out the gravel.
How to Add Decorative Touches to Outdoor Steps
Decorative Stair Handrails
It’s vital that your outdoor steps are safe to use. Handrails or side walls are very effective when there’s a drop of two or more feet to the side. They also add some craftmanship and eye-popping beauty to the backyard stairs.
Handrails come in a wide variety of materials for just about any budget. Some of these include:
- Glass panels
- Smart tensioned cables
- Curved cast-stone
- Ornate ironwork
- Laser-cut steel panels
- Timber posts
Decorative Garden Plants
One of the most outstanding ways to bring more natural beauty to your garden steps is to add flowers and plants. Put them in decorative pots and planters and strategically place them up the stairs. Add annuals for seasonal pops of color and perennials right next to the stairs for continuous growth throughout the year.
Decorative Garden Pathways
Have a cottage garden? Why not use reclaimed flagstones to an existing slope. Use salvaged bricks to support the stones and add more personality to the landscape. You can also install pathways using various other hardscape materials, such as:
- Bricks
- Pebbles
- Pavers
- Mulch
Decorative Built-In Planter Boxes
Adding planter boxes to the tops or up the railing of the garden steps helps create a balance between your hardscapes and softscapes. Give your patio stairs an enchanting effect with miniature alpines or something more dramatic like delphiniums and hollyhocks. Planter boxes can be made out of various materials, including wood.
How to Design More Unique Garden Stairs
When designing garden stairs, keep in mind that they don’t have to be straight steps made out of wood. You can create circular or rectangular stairs. And you can create a more unique look by adding pathways and walkways to the stairs, as well as flowers, plants and other hardscapes to give the area more character. Here are some ideas to help you get started:
Pebbled Pathway
Install a pathway using pebbles and separate it with layers of steps made out of wood. Line both sides of the stairs with landscape shrubs leading from the deck to a secluded wooden bench placed on paved concrete flagstone.
Central Attraction
Install a rectangularly shaped staircase made out of slabs of concrete. Line the staircase with rectangular borders in front of the house, using it as a centerpiece focal point. Surround the house with a diverse mixture of trees, plants and other greenery leading to the backdoor of the house. Also, add flowering plants to attract pollinators and green herbs for convenience when cooking.
Stone and Concrete
Surround your backyard garden steps with stone and slabs of concrete. Add colorful flowers and Bermuda grass to the sides of the stairs to give a warm feel. For an added visual touch, choose flowers and vining shrubs that both match the color of your home and add contrast to it.
Mixed Greenery
Create a haven around your garden steps with shrubs, edible herbs and crawling vines. Then, make the area look even more inviting by adding sprinkles of begonias, water lilies, black-eyed Susans, pansies and other yellow flowers. Surround the stairs with concrete and use the flowers to warm up the stones.
Natural Elements
Throw in some landscape stones and rocks to add beautiful, natural elements to the staircase space. Use lush-colored flowers throughout the area to connect your concrete area to the hardscape steps to make them pop.
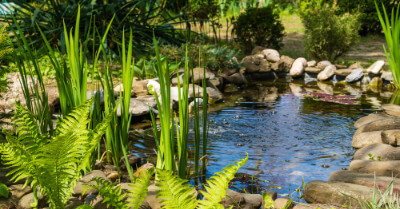
Mini Waterfalls
Build your own DIY mini waterfalls on the landing of your outdoor steps using landscape stones and rocks to bring nature even closer to your backdoor. Allow yourself to enjoy the space even more by adding a picnic table or patio tables and chairs to the landing.
Concrete Pathway
Install a concrete pathway that leads to your patio stairs and surround the immediate area with curved pavers on one side and round stones on the other. Add patches of Bermuda grass and sprawling green shrubs to create a harmonious look that spruces up the area. This helps you create an area that’s perfect for quiet moments and meditating.
Recent Articles