Table of Contents
Getting Started with Rock Gardens
There are multiple ways to go about designing a rock garden for your outdoor space. The designs can range from rustic mounds of plants and stones to faux river beds to naturalistic creations.
It would depend on your location, size of the outdoor space, your preferences, and your wants. If you have a smaller space or are new to landscaping then it is always ideal to start small with a simple design. Basic rock garden designs can fit into any space and enhance the overall look and feel of the space.
Before getting, ensure you have the basic tools and supplies ready to smoothly design and create your rock garden.
What You'll Need
Here are the things you would need:
Tools
- Wheelbarrow
- Garden trowel
- Shovel
Materials
- Preferred Plants
- Soil (as needed)
- Rocks and Stones in a variety of sizes
Major Steps to Design a Rock Garden
With the right knowledge, designing a rock garden can be pretty simple and easy. To get you started, here is a step-by-step guide to help you create an ideal rock garden design for your outdoor space:
1. Determine Your Rock Garden Needs
You need to decide the main purpose of the rock garden since there are multiple types of rock garden.
Will it be the main attraction for your outdoor space or do you want it to complement the rest of your landscape design? What sizes of rocks would be suitable for the space you have? Would you prefer to make larger rocks the focal point or small stones?
These questions will help you get a better idea of building your rock garden and provide you with a place to start.
2. Find Good Sources for Stones
To create a rock garden, you will need good-quality rocks. This means you have to research reliable suppliers to ensure you get the rocks you need without compromising on quality.
A good rocks supplier will also guide you about the type of rocks that could work for your garden space and the type of rock garden you want to create.
3. Create a Plan
Once you have a basic idea of how you want to create a rock garden, you can then come up with a plan.
There is no wrong way of designing a rock garden but you have to be patient since the rockery mellows over the years, making the rocks and plants more harmonious. It is best to build the rock garden after rainfall as the ground becomes softer and easier to manipulate.
4. Design a Layout
When you know the type of rocks you will be using and the kind of rockery you want for your garden, as well as when you want to start building the rock garden, you can design a layout.
Be sure to consider the size, colors, and textures of the rocks, along with their placement. You would also have to include the other features you want to add.
5. Prepare the Space
Before you create your rock garden, you have to prepare the area. This includes removing any weeds from the space.
Having a weed-free space is vital; otherwise, overgrown weed can destabilize the structure of the rockery with time. If the area has a lot of weed, make sure to use a weed killer before you build the rock garden.
6. Create a Strong Foundation
Foundation is crucial for a stable and healthy rock garden. Therefore, this step should take more effort and concentration on your part. The base of the rockery should be well-prepared, sturdy and solid.
Dig up the area to place a good foundation and evacuate the soil once it gets dry. After using the weed killer, dig up the soil for around 40cm. Use safety tape and posts to section the area and remove and add the soil as needed.
7. Consider the Drainage
Another crucial step is adding a drainage layer, as this will prevent flooding and ensure your rock garden lasts for years to come. You can use heavy rocks, broken terracotta pots, or pieces of brick or concrete to create the drainage layer. Weed removal and proper drainage will also help you in preventing common pest problems in gardens.
8. Start the First Course
Once the foundation and drainage layer is done, you can begin the first course. Start by layering the rocks in a circle around the perimeter of the rock garden. Make it about 4 feet in diameter or your preferred size.
This creates an elevation from the surrounding surface. Use the least attractive and largest rocks you have to create the first layer. Make sure the stones are not larger than 12 inches in dimension.
Use sandy soil to fill up the inside area, which will further enhance the drainage. If you are using clayey soil then be sure to add compost and sand.
9. Add in The Rocks
Next comes the rocks layer. It can be created in the simpler way as the first course but smaller in size. You can start creating a circle within the circle. You can also change the design according to your preference.
No matter what the shape, this layer should provide sufficient space for planting between the bottom layer and the rocks layer. It should also include space for any additional elements you want to include.
The best thing about this step is that you can experiment around to see what works for your garden space. Ensure you use the heaviest rocks at the bottom and add the lighter ones to create designs.
This is where you showcase all the best-looking rocks, even if they are in different sizes since these rocks will be visible. Ensure you place the rock pointing in a different direction as it will create a microclimate for the shrubs and flowers you later plant.
10. Leave It To Set
After you have placed and arranged the rocks, you need to leave them to set. It takes a few weeks for the soil and rocks layers to drop considerably and might need an additional layer before you plant anything.
Weather conditions could also change the rock formation and might flatten the soil on the rocks layer. Letting it set is crucial to creating a sturdy and steady garden.
11. Decide Which Plants to Include
Once the rocks are set, you will have to start planting. However, first, you need to determine which plants you want to add. A great place to start is selecting the color scheme that could work great with your rocks. There are numerous landscape color scheme ideas to consider.
For instance, if your garden has mostly red stones, you can include a few flowers with red shades, along with white, yellow, silver and other complementary shades of plants.
Additionally, ensure you select the plants that grow well in a well-drained soil. Ensure all the plants you select for the rock garden have similar requirements for water. You will also have to consider the full-grown length and width of the plants before you start planting. This will help determine the right location to grow the plants.
Another thing to keep in mind is the texture variations of the plant to make sure you create a visually appealing impact. Aside from that, you also have to select the plants according to the location of your rock garden. Will it receive full sun or is it shaded? This is crucial for the health and growth of the rock garden.
Here are some plant ideas for both full sun and shade areas:
Ideal Plants for Full Sun
Here are some ideas for plants that love the full sun:
Yellow Alyssum: This is a beautiful flowering plant that is a popular choice for your rockery. The yellow alyssum is a low-growing plant and effortlessly spread, meaning there is no need to plant a lot. Only a few will quickly fill up the space. It forms clusters of beautiful yellow flowers during the spring season. This plant is drought tolerant and can grow well in poor soil as well.
Blue Fescue Grass: This is ornamental grass that forms blue tinted foliage and yellowish-green small flowers. It grows to a height and spread of one foot. The foliage looks stunning in rock gardens.
Candytuft: This plant creates breathtaking snow-white flowers that can look amazing in the rock garden. Candytuft is gorgeous and blooms in mid-spring and has a unique pattern on the petals. However, this plant doesn’t have a pleasant aroma. It is still beautiful to look at and can tolerate drought conditions. You can plant them at the back of the rockery to utilize its beauty and avoid the smell.
Pasque Flower: This is another stunning plant that produces bell-shaped flowers and can have a major impact on your rock garden. This plant is low-growing, clump-forming and blooms in the spring season. The bell-shaped flowers add dimension and depth in the rockery. These grow well under the full sun but can also thrive in light shade.
Ideal Plants for Shade
Here are some ideas for plants that thrive in shade:
Trillium: The trinity flower can change the game of your rockery. Trillium has three petals and three leaves on the flowers once they bloom and even has three sepals. This plant produces red, yellow, or white flowers during the spring season and thrives in shady areas.
Hostas: This is a hardy perennial plant that is extremely versatile. It comes in numerous sizes and colors, working well in most conditions and climates. Hostas bloom delicate flowers during the summer season in shades of pink, white, or lavender.
Coral Bells: This plant thrives in full and partial shade. Coral Bells have long stems and produce pink bell-shaped flowers on top of the step. These are perfect for adding color and interest in your rock garden, particularly because they attract hummingbirds.
Astilbe: This plant is a perennial plant that produces showy blooms and fern-like foliage. Astilbe thrives in areas where other plants are unable to grow, making them an ideal filler. They also add a nice color to the rockery to make it more appealing.
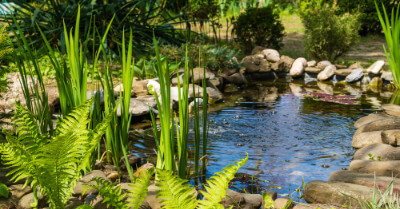
12. Include a Water Feature
Running water transforms a rock garden by adding a touch of tranquility. Even a small pond can give character to the space. You can line up the shore with beautiful rocks and consider including natural stone pavers or gravel to add a walking area around it.
13. Consider Terracing
Terraced rock garden or stone slab steps in the rock garden is a great way of adding dimensions to your outdoor space. Keep in mind that this is an option and requires creating vertical levels that need more labor and planning, along with some engineering to get it right. Consider this when you have the right budget and time.
14. Hire a Professional Rock Garden Designer
If you are really looking for the wow factor, you should consider consulting an expert to plan and design your rock garden. The best thing about working with a professional is that they listen to your needs and wants, evaluate the outdoor space and come up with the most appropriate and creative way to make your dream rock garden a reality.
Recent Articles